Many thanks go out to Peaty, my evil twin, for his help and his pictures with the gas door spring (in addition to many other things!) so we can all get this mod accomplished. Having done this mod myself, I don't think I would do it again, were it not for the obvious benefit to having a fuel door that locks. The actual install of the locking mechanism and the release handle is quite easy; however, running the cable through the cabin takes a great deal of dismantling and possibly the use of a few four letter words. Questions or comments may be directed here.
The parts needed are listed below:
Spring for door - 57651FA000
Cable assembly - 57330FA030
Fuel tab - 57346AA010ML
Trunk tab - 57346AA000ML
Pull handle assembly - 57340AA010
The flat fuel door part number now supercedes to the tabbed door found on the 1998 to 2001 Impreza RS. It must be sourced from overseas- mine came from the UK.
Flat fuel door - 57601FA000
An alternative to obtaining a metal flat fuel door from overseas is to locate one of the plastic ones in a junkyard; they are found on some 1993 to 1995 Impreza models.
On with the instructions
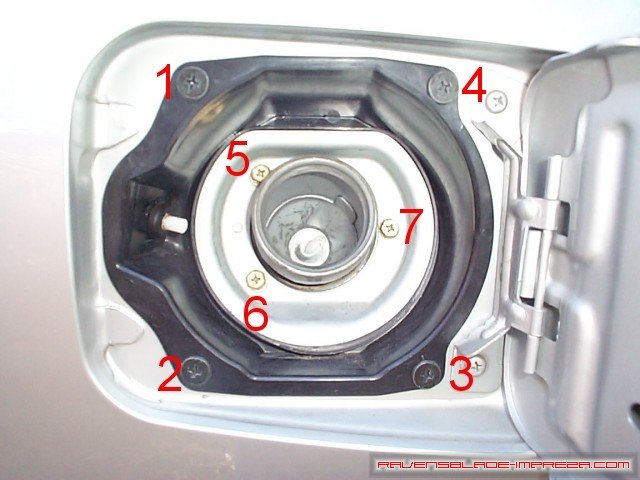
We will start everything out on the outside of the car, at the gas filler door. In this picture, you see the 7 bolts that have to be removed to gain access to the locking mechanism. Three bolts hold in the center metal trim ring, and the four outside bolts hold in the plastic liner to which the locking mechanism is attached. After removing these 7 bolts, pull out the center metal trim ring, and then you will be able to wiggle out the plastic liner. You will need to pull from the right edge out towards you, as the locking mechanism and drain tube (you will see them soon) prevent it from coming straight out.
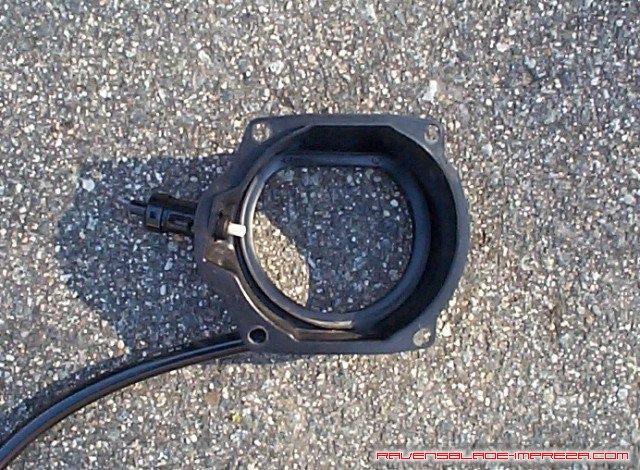
In this picture, you can see the thick black gas drain tube and the non-functional locking mechanism on the left side of the plastic liner. The locking mechanism simply needs a one quarter turn to unsnap it, and then you can pull it to the left to get it out of the liner. The working mechanism (attached to the cable) goes back in the same way. When you have the locking mechanism attached, push all of the cable and the drain tube into the fender, wiggle the black plastic liner back in place, put the metal ring back on, and proceed to screw everything back together. Now, it's time to dismantle the trunk.
I won't go into too much detail about removing the lining of the trunk, as it has been covered many places many times before: basically, pull out all of the snap rivets around the edges, and pull the fuzzy plastic material out of your way. You will then see the metal body of your car which, in my case, is silver.
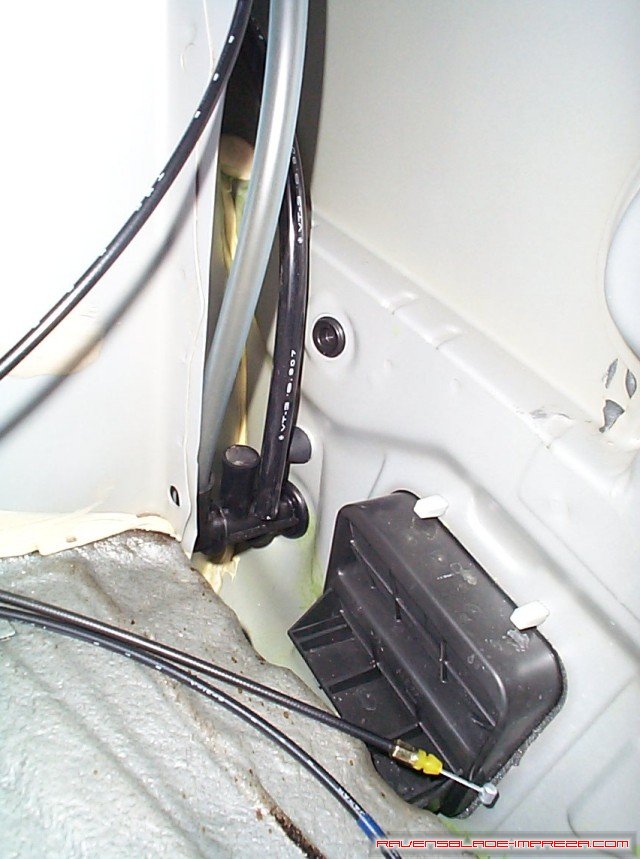
In this picture, you can see where the thick black drain tube and the cable end up. Take a good look at the picture... see where that clear tube runs into a black pipe? You need to reconnect the gas overflow drain into the second hole, or spilled gas will end up in your trunk; how fun would that be?
Ok, on with the show. From here, it gets interesting- it's time to snake the cable all the way through the whole interior of the car... prepared to have cut, bruised hands within the next few steps! If you look up by the right hand trunk hinge, you should see a hole that a bunch of wiring harnesses run into: this is where you will push the gas door release cable through into the interior of the car. You will probably only be able to get it in about two or three feet but that is far enough for now. It is time to dismantle you rear seat, so you can pull that cable across the back seat and up the driver's side of the car.
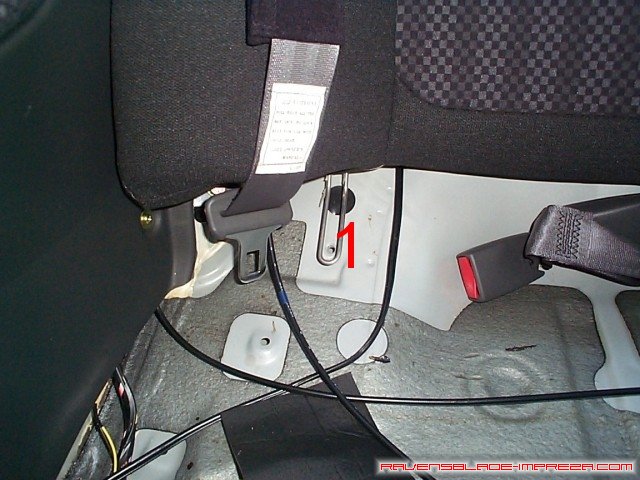
I did not take a picture of the next step, as it is fairly straightforward. The lower part of the rear seat needs to be removed. First things first, put both seats all the way forward and the seat backs all the way forward as well. There are two bolts holding in the rear seat cushion, one on the driver's side and one on the passenger side, located right behind your calves if you were a seated rear passenger. Remove both of these bolts, give a tug, and the whole cushion will come out en masse. With that done, you can see three of the five bolts holding the seat back on. You only need to remove the very far left one (facing the rear of the car that is). In the picture below, you can see where I removed the bolt in question (I labelled it #1). I then reached behind the seat and just pulled the cable through from the trunk. At this point, you can reassemble the lining of your trunk and take a break: it gets fun from here on out.
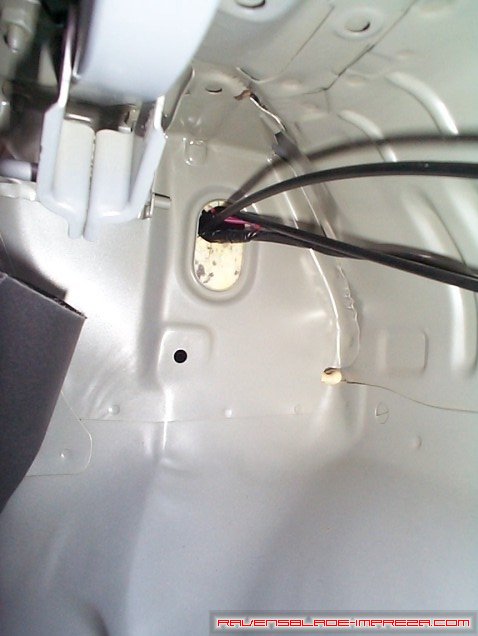
In this picture, you can see a lot of black cables (3 in total). One is the trunk release cable, one is the data cable from my CD Changers, and the last is the gas door release cable. From here, run the gas door release cable over alongside the trunk release cable, toward the driver's side of the car.
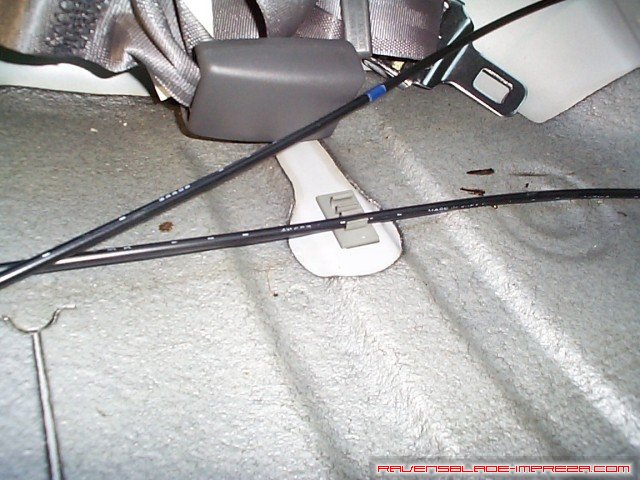
This next picture is of the area under the rear seat on the driver's side of the car. You will notice that the trunk release cable runs through a plastic bracket stuck to the car body... it even has a spare spot to stick the gas door cable (why didn't Subaru just put it here in the first place?). Just press it into that channel, and then it's time to do some more dismantling of the car, starting with the driver's side doorsill.
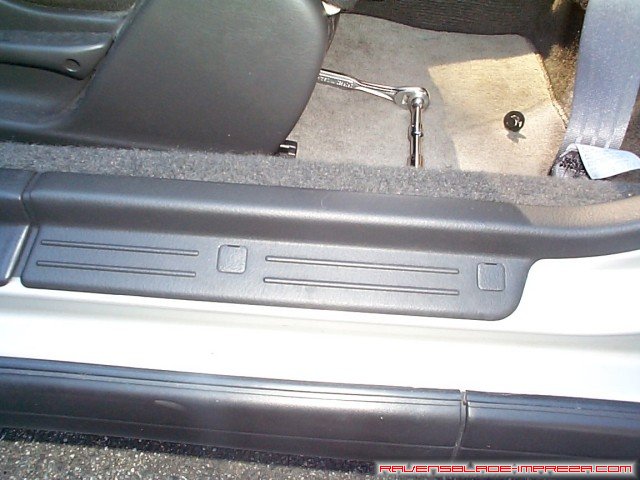
Ok, here is a picture of the doorsill. It is held in by plastic plugs, which you can also see here. Stick a flathead screwdriver in the small slot and pry up: they pop out. You need to remove all of these, plus two plugs up near the door hinge (one inside near the plastic 'dead pedal' and one outside near the hinge itself) and two more plugs holding the rear section of the sill on (about a foot below the windows right on the center 'B' pillar). Lastly, you have to remove the bolt holding the seatbelt in, so you can get the carpet out of your way completely (I told you this would be interesting, didn't I?). Now, just peel the carpet back- it is locked into a plastic channel. Just pull up on the channels and it will pop out and peel back, like in the picture below.
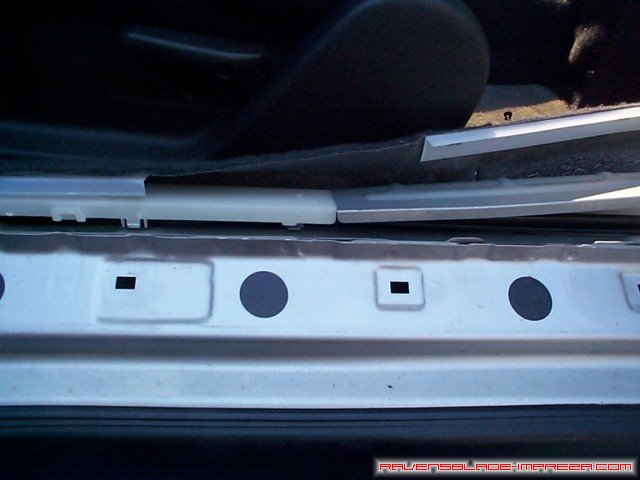
With all the carpeting out of the way, you should see a white plastic and metal 'shield' under where the carpet was. Pry that up, so you can get your hands under it: you need to pull the gas cable under this shield, and you will actually see another free anchor point (labelled '1'), like in the picture below, running next to what look like brake lines.

After the cable is secured in this clip, you will need to pass it underneath the brake lines. There is a small bulge in the body of the car with a half-dollar sized hole in it under these brake lines (I could not get a clear picture of it because the lines are in the way) that you can see the trunk pull cable running into. Push the gas door pull cable through that same hole. At this point, you can reassemble the doorsills, bolt the seatbelt back in, and reinstall the rear seat. All the pain and suffering is nearly over!
A word about the door flap. I'm still trying to get a door that is flat, with no tab. The flat door was standard on the 93-95 Impreza's. Currently the only way I know of getting one is from an auto recycling center. Those doors have the release spring already installed. If you can't find one either, you'll have to add one to the existing door like I did. If you have purchased the flat fuel door, you can skip this section, which details the modification of the stock RS fuel door to accept the spring that easily snaps right onto the flat fuel filler door.
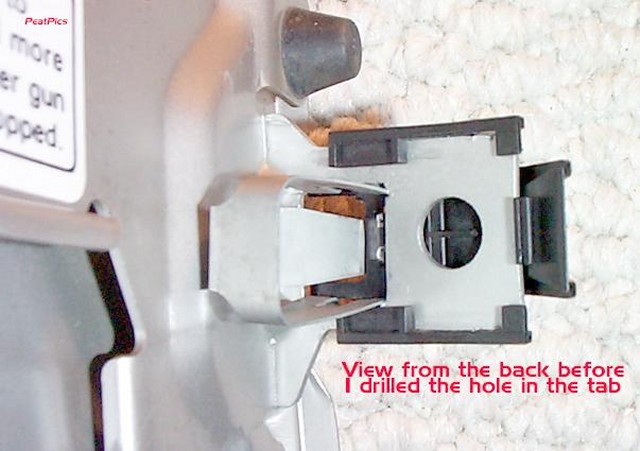
This is what we all have to work with; the stock fuel filler door and the black plastic tab. The tab will need to be removed in order to modify the locking tab to accept the opening spring. The gas door should be removed to make the process easier. To do the work on the door you'll have to remove it. There are 2 phillips screws that hold it on.Before I removed the door I traced around the hinge so I would put it back on in the proper place. It turned out that it wasn't necessary, the screw holes aren't slotted; it only goes back on one way (which can also be read, "even I won't screw it up". -Brian).
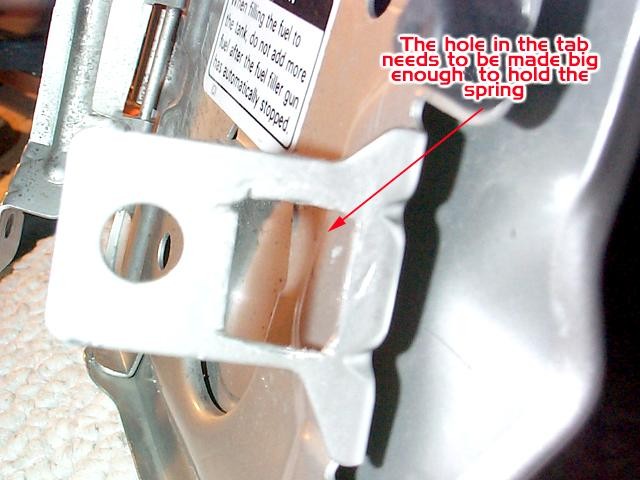
I used a Dremel with a cutting wheel to enlarge the hole in the door tang...
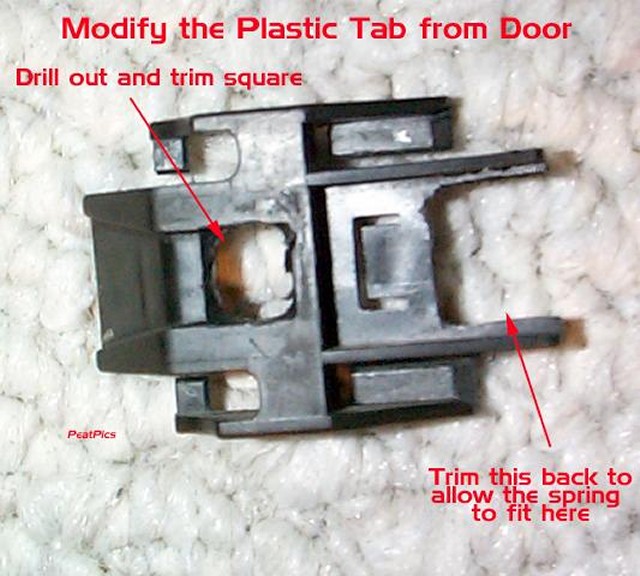
...then I used a drill to put a hole in the plastic thing that goes over the tang so the pin could go in there and lock. I put some touch up paint around the cut surfaces. You won't be able to see the cuts but I didn't want any rust to start.
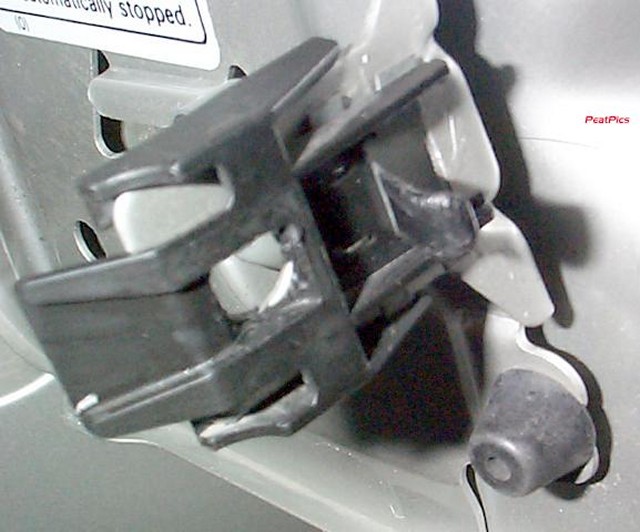
The completed, installed fuel door spring and clip.
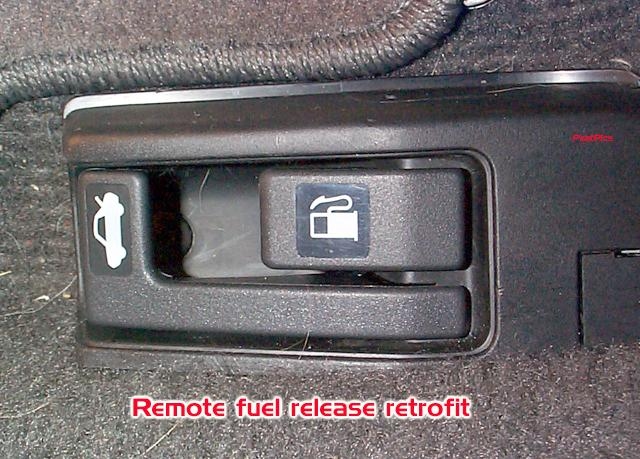
Here, you can see how both levers can fit into the same stock housing. -Peaty

The completed locking flat fuel filler door.
Standard Disclaimer: Modification of your car involves risks and may void your warranty. I can not be held responsible for the modifications you consciously decide to undertake nor for the results of doing so.
|
|
