This page arose out of replying to topics on UBB's all the time on how to bleed brakes. It's not a difficult process, but it is best done with two people. You can use these instructions to completely flush the brake system or just to bleed them after a brake job. If you do a complete flush, have 32 to 64 fluid ounces of your favorite handy to refill the system. If you are only bleeding the air out of the system, 16 ounces should do. If you have any questions, please feel free to email me.
Step One
The first thing to do is get yourself the needed materials: brake fluid, a small bottle, some clear plastic tubing, and some food to bribe one of your buddies to help you out. Next, get the car on jackstands, with the wheels off. This seems like overkill, but it will make the job alot easier. That being said, you can do this one wheel at a time on the stock jack if you lack jackstands or a floor jack if you so desire. Having the wheels off is a good idea because it allows you to see what you are doing much better, and it gives you a chance to inspect the rotors and brake pads in detail while you are at it. With the wheels off and the car up, it's time to open the hood and go at it.
STEP TWO
Uncap the brake fluid reservoir to allow you to fill the reservoir as the fluid level goes down and also to allow any trapped air to bubble out at this end of the braking system.
STEP THREE
Go to the passenger side rear corner of the car. On the top of the brake caliper, you will see a small black dust cap over a nipple with a nut at the base- this is the bleeder valve; a picture of it is below:
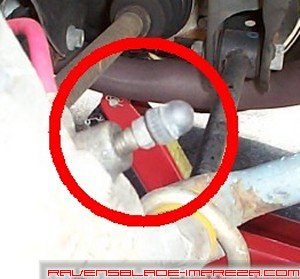
Bleed nipple cover and bleed screw
You want to start here, as this is the farthest point away from the Master Cylinder. Pull the rubber dust cap off the bleeder valve, and attach a 4 or 5 inch length of 1/4" clear plastic tubing to the nipple. The clear tubing will allow you to see any air bubbles that rise out of the caliper as you bleed the brake system. Place the other end of the tubing into the bottle or cup you have handy to catch the expelled brake fluid. Whatever fluid you bleed out of the system DO NOT SAVE- it will be contaminated with anything from dirt to water, and you do not want to put this back into the system. Dispose of it in the same way you would used motor oil.
STEP FOUR
Now is the point where you need that good buddy. Open the bleeder valve (righty tighty, lefty loosy applies here) and have your helper pump the brakes. Push the pedal to the floor and release, push and release. If this is a complete flush of the system, have him/her just keep pressing until the line becomes totally empty. If you are bleeding the brakes from a full flush, he or she may have to manually pull the pedal off of the floor after the first 2 or 3 pumps. If you are just bleeding the brakes, there should be good resistance throughout the process. In any event, you want your friend to continue pumping the brakes until no more air bubbles, not even very tiny ones, are visible in the clear tubing. It is better to waste 4 ounces of fluid than to leave a bubble in the lines. Check frequently to make sure there is PLENTY of fluid in the reservoir if you are bleeding the system- if it runs too low, you will suck air in at the Master Cylinder, and you will need to start all over again. Keeping the Master Cylinder topped off in the bleeding process is CRITICAL.
STEP FIVE
Once you get no more bubbles in the line, have your friend push the brake pedal to the floor AND HOLD IT THERE. What you need to do is to tighten the bleeder valve back down tight while he or she has the pedal held to the floor. Make certain they do not release the brake pedal until you have the bleeder valve tight again.
STEP SIX
Repeat steps three through five on the other corners of the car, in this order:
- Driver's Side Rear
- Passenger's Side Front
- Driver's Side Front
Doing so will ensure that you are pushing almost all the air out of the farthest end of the system, making each subsequent corner easier to bleed. If you are completely draining and flushing the system, doing so in the same order will ensure almost all of the fluid is out of the system at the first corner, again making each subsequent corner easier to do. You always want to work from the farthest point away from the Master Cylinder back to it.
STEP SEVEN
The final step is to top off the Master Cylinder to the top "fill" line and cap off the reservoir. If you completely flush the system and refill it, it is probably best to rebleed the brakes after a week to ensure you have no trapped air in the system- completely draining the lines introduces a good deal of air into the system, and it is best to make certain it is all removed.
A bit of an edit here; some people ask "Why not just use Speedbleeders?" and the reason I don't is because I don't trust them. Any product that there is a process in place by the manufacturer to remove them when they break is just sketchy to me, and I have seen them break several times myself. However, I have found that they have their place, and can be used quite effectively without the potential for breakage. A clever guy in Germany rigged up their version of a Speedbleeder on a plastic tube for me, illustrated below:

You open the bleeder on your caliper, place the open end of the tube over the bleeder nipple, and then put the Speedbleeder end in your catch bottle. This allows the one-man bleeding of the calipers without having to put the Speedbleeders physically in the calipers. Best of all, one set of Speedbleeders can be split amongst four people for a cost savings!
Standard Disclaimer: Modification of your car involves risks and may void your warranty. I can not be held responsible for the modifications you consciously decide to undertake nor for the results of doing so.
|
|
